Deprecated: mb_convert_encoding(): Handling HTML entities via mbstring is deprecated; use htmlspecialchars, htmlentities, or mb_encode_numericentity/mb_decode_numericentity instead in /home/u598013642/domains/motorcyclegear101.com/public_html/wp-content/themes/acabado/functions.php on line 1901
Deprecated: mb_convert_encoding(): Handling HTML entities via mbstring is deprecated; use htmlspecialchars, htmlentities, or mb_encode_numericentity/mb_decode_numericentity instead in /home/u598013642/domains/motorcyclegear101.com/public_html/wp-content/themes/acabado/functions.php on line 1901
Changing your motorcycle brake pads is not difficult; you just need a few simple tools so you can do it at home yourself.
Changing motorcycle brake pads can be done by simply…
- Remove Retaining Bolts
- Remove Caliper Pin
- Remove Brake Shim
- Inspect Old Pads
- Check Rotor Disk Condition
- Clean Brake Parts
- Lubricate Brakes
- Add New Brake Pads
How To Change Motorcycle Brake Pads
Best price for brake pads, guaranteed, visit revzilla.com
When To Change Motorcycle Brake Pads
Before we go into how to change motorcycle brake pads, it’s essential to know if and when to change your motorcycle brake pads.
Several different factors determine how quickly brake pads wear out. The type of vehicle, type of use, and the type of brake pads all make a difference.
There are a few common signs that you should pay attention to that may indicate a problem with your brake system.
It could be that you’ve noticed that your bike doesn’t stop like it used to and if you see any of the following symptoms, take a closer look.
Or, if you’re not entirely comfortable diagnosing the problem yourself, you should seek professional help.
Motorcycle Brake Pad Wear Indicator
The first warning sign to pay attention to is squealing. Your brakes should operate with very little to no noise at all.
Brake pads have wear indicators that are designed to cause squealing when they’re worn down.
Be sure to have them checked before the squealing sound turns into a grinding sound.

Another problem you may experience is your bike pulling to one side of your handlebars, wheel shuttering side to side when you brake.
The issue can be a seized or hanging caliper, rotor thickness, or warped rotors.
These conditions can cause noise, excessive wear, and poor braking. It’s also possible that you find yourself having to pull your brake lever almost all the way in before your brakes engage.
That’s usually a sign of brake fluid leakage or a bad master cylinder.
Finally, if you see the brake warning light on your dash come on, you need to inspect your brake system or have it checked as soon as possible.
If you’re reading this post, my guess is you fall into one of two camps. You might be the rider who has worn out their OAM brake pads, and they’re looking to replace, or the smaller subgroup of you may have some life left in your brake pads.
It doesn’t matter, but you’re looking to change your brake pads mostly to get some different characteristics concerning braking.
You might be looking for something with a little more initial bite, or perhaps a pad that dusts a little less.
Regardless, you’re looking to change your braking experience to experiment to see what else is out there and how you can upgrade your factory ride.
The process of changing your motorcycle brake pads is going to be pretty similar, from motorcycle to motorcycle.
If your bike has a drum brake or something that is mechanically actuated, it is going to be a little bit different, but those are few and far between.
One of my bikes is a fairly late-model motorcycle, and it has disc brakes, so in this article, we are going to look into changing brake pads on a bike with disk brakes.
My bike is equipped with a radial caliper. If you have conventional mount brakes, the process is very similar.
The tools you need are pretty minimal, just a couple of hand tools to get this job done.
Even though changing brake pads on a motorcycle is mechanically simple, brakes are essential.
You need to be able to stop, so you should be confident in your ability to change the pads.
If it’s something you’re a little bit concerned about, have a buddy walk you through it.
But, if you’ve got some decent tools and you’re confident that you know what you’re doing when it comes to general mechanical knowledge.
Most people should be able to get a brake job done themselves with a minimum of effort.
I’m going to describe the process, and to begin, we’ll start tearing this bike apart. First, you need to remove the brake caliper. Once you get the caliper off, you will check the condition of the pads.
You should first check the state of the rotors and then clean everything up, especially the ones you’re going to be putting back into play.
From there, you are going to lubricate a couple of essential pieces, you are going to put the new pads in you are going to bolt everything back up, and they’re pretty much complete as a job is very simple.
Before we get started, there are a couple of things I do want to warn you about. First, you should think about wearing gloves when changing brake pads.
Brake pad material is carcinogenic; this means the dust that collects on your brakes is also carcinogenic. Some of you may even elect to wear a respirator.
The second thing I should warn you about is you are doing a brake job, and you are probably changing brake pads on a bike that has a hydraulic system.
Once you have the caliper off, you mustn’t hit the brake lever or the brake pedal, depending on whether you’re working on the front of the front or the rear of the motorcycle.
Make sure that once that caliper comes off the bike, you don’t hit the brake pedal or the brake lever. It could be as severe as requiring a caliper rebuild, which is no fun, especially if you’re trying to do just a quick brake job.
The first thing you should do is remove the caliper so that you can assess the condition of some of the parts inside the caliper.
Remove Retaining Bolts
Start by removing the upper and lower bolts that are holding the caliper together, as you do that support the caliper, the reason you should do that is that they are the only two things holding the caliper to the motorcycle.
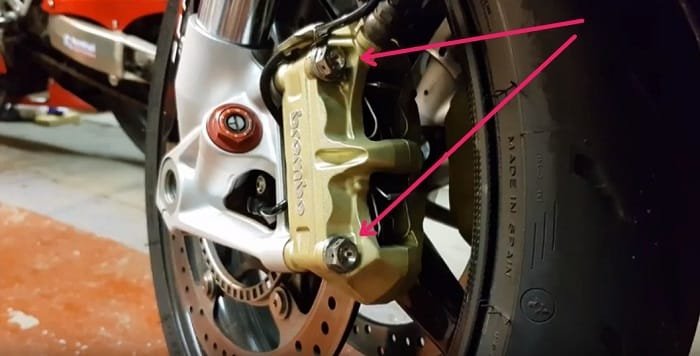
Caliper Support
One item to note: Once you do get the retaining bolts loose, supporting the caliper can be crucial.
My bike has a reasonably lightweight aluminum caliper on a solid stainless line, so it’ll be okay if this one hangs by the weight of the caliper.
However, if you’ve got something a little different, if you’ve got say, a big heavy caliper hanging off of maybe a weak rubber line, you might want to think about supporting your caliper to avoid any damage.
You could use maybe a wooden block or a chock to set it on or perhaps to unbend a coat hanger and running it from above to suspend the caliper, especially if you have a heavy caliper, a reasonably weak brake line.
As you slide the caliper off, you are going to get a better look at the caliper. As you remove the caliper, be careful not to bang it against the wheel, that’s a big concern for you sportbike guys who have big rotors.
Remove Caliper Pin
Once the caliper has been removed from the disk, you will be able to see some of the components that make up the caliper and brake pad system.
To get all of the pieces out so you can start assessing things is to remove the caliper pin.
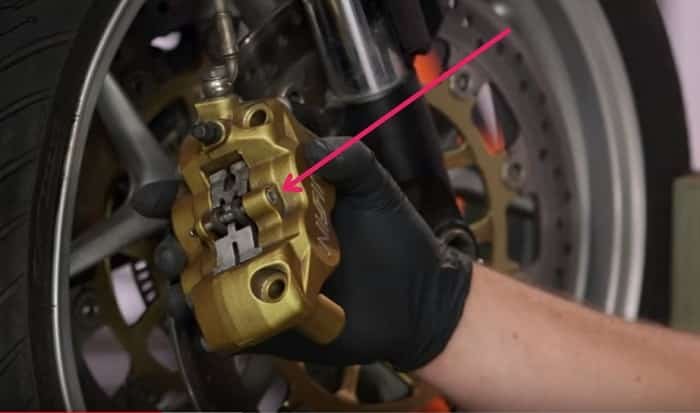
This is going to be the piece that’s probably different from most riders. Not everyone is going to have one pin. You might not be able to see your pin, or your bike might not even use a pin.
However, use this again; it’s a rough guideline for how this process is going to work out for you.
The first thing you should do to take the caliper apart is to remove the cotter pin that is holding the caliper together and put it to one side as you are going to use it later.
Once you have removed the cotter pin, you should remove the bold that is holding the caliper together.
Make sure you have your hand both above and below the pin as sometimes these things can explode once you take the retaining pin fully out.
Tip: If you don’t have a factory service manual, now is an excellent time to take a picture or two with your phone.
Ideally, you should use a factory service manual as that’s the best way to make sure you get things back together.
As I said, this might fly apart once you remove the retaining pin, so make sure that you are holding the caliper with one had as you are removing the retaining bolt with the other.
Remove Brake Shim
The first thing you will remove s the brake shim. The shim provides a little bit of downward pressure, which keeps the pads from jiggling around inside the caliper. You are going to reuse this, so you want to set this aside as well.
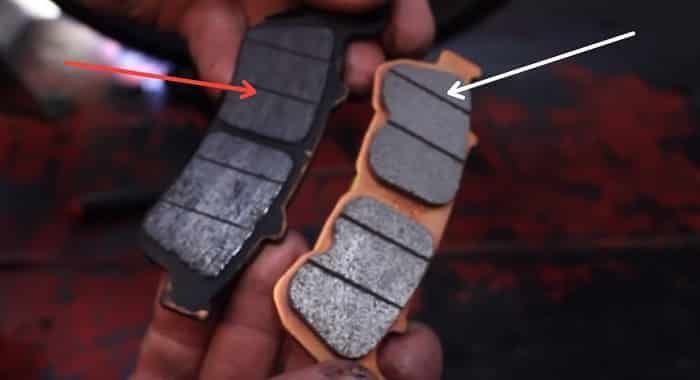
Inspect Old Pads
One of the things that are important as far as doing your brake job as far as using new pads is first examining the old parts to make sure they’re wearing correctly. One of the things I like to look at is the wear across the whole pad.
For example, most brake pads will wear pretty evenly across the whole of the brake pad. That’s a good thing; it means it’s not cocking in its bore.
If you do notice some wear pattern where it is wearing on one side more than the other, it can indicate a few things.
It might show improperly lubricated slide pins. In my case, my pads, there’s only one pin that wouldn’t be the issue.
The other thing that might indicate a problem is perhaps a set of caliper pistons that might be hanging up.
You might have a piston that’s hanging up somewhere. Only one piston in a multi-piston system is doing its job, so it is vital to examine that for two and aft wear.
Another essential thing is top to bottom wear, how the pads wear from the outside of the brake pads.
The outer circumference of the brake into the center of it. Some of you may notice that your brake pads could cock, perhaps the other way.
Again, due to improperly lubricated slide pins or in an awful scenario, if you’ve got a prominent ridge at the top of the pad of unused brake material, a lot of times that points to an improperly installed brake pad.
Be picky as you’re pulling the brakes apart to make sure everything was put together correctly. Odds are, you’re probably going to find a mistake. Keep that in mind as you’re assessing things.
Check Rotor Disk Condition
The other thing you should also check is the condition of the rotor. You should review the surface of the rotor.
It should have a flat surface; it should be smooth with no glazing over and no deep scouring.
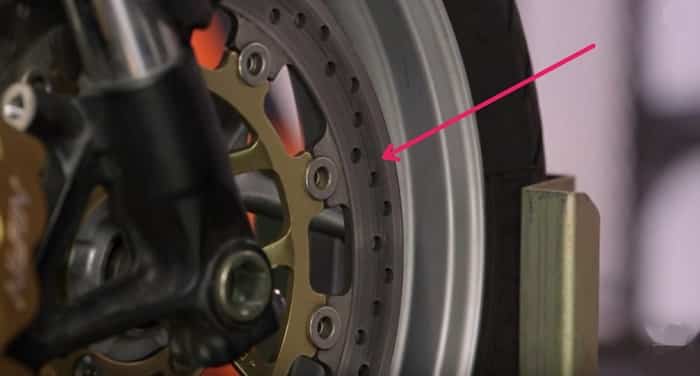
If you happen to be servicing your brakes because you heard a terrible scraping noise that’s not good, what that probably was was the metal backing plate digging into your rotors, and that could be an expensive repair if the disk is damaged.
You’re probably going to need to replace your rotor if that happened. The reason is that if you wear those scores, those deep grooves into your rotor can chew into your new pads, and all you’re going to do by replacing the pads is mask the symptom. You’re not going to address the problem.
Even if your rotors do look good with no deep scoring, you still need to measure them. The pads themselves as they squeeze onto the rotor, scrub it away. They squeeze the thing until, eventually, the rotor wears down.
To check that the rotors are worn evenly, you will need a micrometer to check the thickness.
When you do this, you want to do it a couple of different places to determine the thickness and to make sure the rotor is even on both the inner and the outer surface, and it a couple of places along the diameter of the rotor.
If you have even wear and no obvious hydraulic problems, this is a perfect candidate for a new set of brake pads, so you are going to continue with the process.
At this stage, what I like to do is start cleaning the brake parts, and I usually use a brake-specific cleaner to do that. Cleaning things up allows me to do several things.
First, it allows you to assess the condition of the components more carefully, and the other thing is it makes sure that all the parts that were going to be reused, like the shim and the pin they’re going to have a nice clean surface.
Clean Brake Parts
Using the brake cleaner, spray the caliper down. Again, be careful with this stuff as it is also not that good for you. Use a good pair of protective gloves and maybe a respirator if you have one.
One of the areas you should pay special attention to is the caliper Pistons.
The caliper pistons are kind of important as they are sealed with very delicate rubber seals.
It’s essential to get in there to get everything clean because that brake dust on can be kind of acidic. It can be abrasive as well, so this area is critical to get all cleaned up.
Use a clean rag to wipe around the outer and inner parts of the caliper, making sure that you have gotten all the dirt out of all the nooks and crannies on the caliper; this is pretty important.
As you are cleaning, lookout, and assess how things are looking by cleaning as this will expose a little bit better the condition of the parts inside the caliper.
At this stage, you are pretty much ready to insert the new brake pads, and the reason I cleaned before I start doing anything else is that you are going to have to move the caliper pistons into the board.
This is important because as pads wear down, they get thinner. So, the caliper pistons have to come out closer and closer to the center, to make the pads contact the rotor.
The new pads are much thicker, but they’re not going to fit in the same space, so you are going to drive these caliper pistons back into their bores.
Again the cleaning becomes vital because these pistons are now exposed, and you are going to be shoving them back in place, so we want them nice and clean, so you don’t want to drive all sorts of dirt or general road muck around into the caliper.
Use your fingers to push the pistons back in. You’ll notice as you drive some in some other ones might pop out, but eventually, you should be able to work these all back into their bores.
If you’re having trouble doing that, one of the things I like to do is grab the old pads, put them back into place, then take a pry bar or a flathead screwdriver and use them to drive the pistons back into place.
What you are looking for is for the pistons to be more or less flush with the caliper body itself.
This is going to give you the room you need to get the pads back into the caliper and the whole assembly back up onto the bike now
Lubricate Brake Parts With Brake-specific Lubricant
The first thing I want to talk about is the lubricant itself. You can’t just use any old product here.
You should use a brake-specific oil. The one I use is a silicon-based lubricant. Silicon is good stuff to use because you’ve got rubber seals in the caliper.
Some of you have slide pins for your caliper, and they have rubber boots protecting them.
If you’re using anything that’s petroleum-based, it can tear up the rubber with a petroleum-based product, so the two are not compatible.
Next, you should lubricate your caliper pin. You should use a fair amount of Lube but don’t go crazy.
You want enough Lube that it will stay on there, and it’s going to survive a couple of wet days, but you don’t want so much on that it will be flung all over the place.
The other place I like to lube too, and this might sound a little crazy, is on the backs of the pad.
I put a small amount on the back and spread it around, and the reason I like to do that is you are placing lubricant anywhere metal is moving against each other.
The Pistons themselves hit the backs of the pads a lot of times. When people have brake noise, they can’t figure out it’s not the lining material that’s hitting the rotors making noise. Sometimes it’s the backing plates on the back of the pad.
Put a thin layer of lubricant on the back of the pads. I liken it to buttering your toast in the morning.
Once you have done that, place the pads on a table and remove your gloves and the reason I’m doing it because I have lube on them.
As the necessary lubricant is, we don’t want to get any oil onto any of the moving parts of the bike that have to do with the braking.
We don’t want the friction surface to get any lubricant on them, and we don’t want the pads to get contaminated. We also don’t want any of it hitting the rotor, so be sure to change gloves frequently.
Right now, because I’ve got my caliper Pistons driven back into the bore, I’ve got all my parts lubed up here pretty much set to rock and roll. You are about ready to tackle the reinstallation process.
Add New Brake Pads
This part can get a little bit tricky because you are going to be putting a couple of things in play at the same time, and you might feel like you need three or four hands.
You are going to start loading the pads in one at a time, again being careful not to get lubricant all over the place. Slide the first pad in, and this is also something I want to talk about.
It’s probably going to make a couple of you laugh, but it is essential pads are two-sided.
There’s a friction material and then a non-friction material side. If you put these in backward, you set the backing plate up against the rotor, and you’re going to have a big problem.
It’s metal on metal, and you’re going to ruin your rotor, and you’re probably going to ruin your pad.
You may not stop in time, so pay attention and make sure that the parts of the brake pad that are supposed to touch the rotor are put in the right way.
Here comes the tricky part. Once you have the pads placed back into the caliper, you will need to hold them in place with one hand while you put the shim clip back into place.
What the shim clip will do is keep downward tension on the of the pad so that they’re not rattling around, so every time where we hit a bump, we don’t hear the pads rattling about.
Once you have the shim in place, you can now insert the caliper pin back into place. The pin should go over the pad shim, holding that against the pads.
At this stage, you should be using your factory service manual, you should check out your factory torque spec, and you should use your torque wrench to tighten the pin-down.
Once you have the pin at the correct torque, you should reattach that little cotter pin, and from here, I am just two bolts away from getting it all put back together.
It’s essential to have the pads spread wide enough apart so you can place the caliper back over the rotor. Once you have the caliper back onto the rotor, you can reinstall both of the retaining bolts you removed earlier.
The same deal applies to these retaining bolts as with the other bolt. You really should be using your factory spec on these with a torque wrench.
If you have a duel disk system, you’re going to want to think about the other side.
It’s okay to do fronts or your rear independently, that’s perfectly fine, but if you’re working on an axle with multiple calipers, you want to make sure you service both of the calipers at the same time.
You should service both sides to make sure that your braking performance is the same side to side.
If your brakes are operating differently from each side, you can wind up with weird poles or strange behavior.
The other thing to think about is you are not just replacing the pads. You are also lubricating some pretty essential parts.
So if one side is lubricated well, but the other side hasn’t had any attention, you can notice a difference in performance from one caliper to the other.
With the caliper reattached, you have finished except for one crucial step. Because you drove those caliper pistons back in, they’re not close to the pads right now.
Grab ahold of the brake lever. You’re going to notice it will sink right to the bars.
You might have to pump the brake lever several times to pump the pistons back up to get those caliper pistons back to where they are touching the back of the new pads.
It would help if you did this before you roll your bike out of the garage. It can be very problematic to go ripping down the road and have absolutely no brake power.
Make sure you do that before you ride your bike again. It’s a crucial step.