Deprecated: mb_convert_encoding(): Handling HTML entities via mbstring is deprecated; use htmlspecialchars, htmlentities, or mb_encode_numericentity/mb_decode_numericentity instead in /home/u598013642/domains/motorcyclegear101.com/public_html/wp-content/themes/acabado/functions.php on line 2160
Deprecated: mb_convert_encoding(): Handling HTML entities via mbstring is deprecated; use htmlspecialchars, htmlentities, or mb_encode_numericentity/mb_decode_numericentity instead in /home/u598013642/domains/motorcyclegear101.com/public_html/wp-content/themes/acabado/functions.php on line 2160
Motorcycles are fun, you want to know what’s not fun? Flat tires
Unfortunately, if you do enough miles one day you’ll get a flat, it’s just part of the game. The simplest fix is to use a tire plug and that is how to plug a tubeless motorcycle tire?
Right off the bat, we’re talking about tubeless tires here, the ones that are traditionally found on street bikes, ATVs and UTVs. Just like it sounds tubules tires have no tubes in them, tube tires require a totally different method of repair.
How exactly do you repair a tubeless tire?
Well, there are a couple of factors that need to be considered. First, determine the cause of the flat. Is it a screw, a nail or a staple and the reason is that it might actually make the most sense to leave the object in the tire and just keep an eye on the tire pressure while you limp the bike home.
If its a staple in the center of the tread you’re probably okay but if it’s a nail in the sidewall you will probably we calling a tow truck. It’s expensive but sometimes that’s just the price of safety.
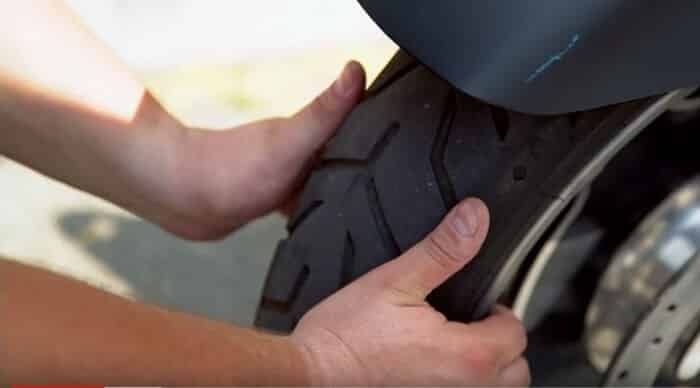
A simple way to see if you need to call a tow truck is to put your thumbs on the outside of the tread of your tire.
Everything between your thumbs is fair game for a repair, everything covered by your thumbs or the outside of them including the sidewall of a tire is probably not going to be repairable.
If you have a puncture in one of those spots load your bike onto a truck, it’s your only option.

Invest In A Tire Repair Kit
Every biker should carry a tire repair kit, you can pick them up from Amazon. Those of us on two-wheeled should always carry a plug kit, unlike those in four-wheel vehicles we don’t carry a spare tire.
If you feel that the tire is safe to plug then get out your repair kit and get started.
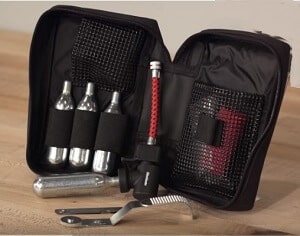
Let’s look at what a plug kit consists of. They should come with a rasp, a T-handle pusher, sticky strings glue, co2 cartridges, and the inflator valve adapter. There is one tool that most kits don’t come with and that is a pair of pliers.
If you have ever tried to remove a screw or nail from a tire it can be quite difficult to get hold of with your fingers, having a pair of plyers to hand will make this job much quicker.

Some kits are quite expansive and contain patches as they’re meant for both tubes and tubeless tire repairs.
There are also plug kits out there that might use a mushroom-style insert but in this article, we’re going to focus on the much more common sticky string type.
First things first. Get yourself off the road so you’re not working close to traffic. Before you decide to remove the object mark the tire at the puncture spot, once the object has been removed it’s a bit harder to see exactly where the hole is.
Another thing to consider is that with the item removed the tire will be losing air so try to have the next step in the process ready to minimize air loss and you’ll use fewer co2 cartridges in the repair.
With the area marked have the rebirth tool ready to remove the object from the tire, but do this slowly if the tires are not fully flat. Remember that the remaining pressure inside the tire can actually turn that object into a projectile really fast.
Take the rasp and apply some glue to it and insert it into the hole in the tire. Work it in and out until it moves easily in the hole, try to do this at about a 45-degree angle taking care to avoid contact with a sidewall.
The idea here is to rough up the edges of the hole to help the plug get a good solid bite. If the tires still holding some air leave the rasp in to contain as much air as possible.
Take the other T-handle, the one that looks like a big sewing needle and put a little bit of glue on it. Insert it into the tire carcass and move it in and out of the hole a couple of times, this is to both lube up the hole and the shaft of the tool.
Take the plug and insert it all the way through the hole. This is going to take some force so make sure you don’t push your bike off the stand.
Pull it out about an inch that isn’t showing and again do this slowly, now the plug is about two-thirds of the way in the tire and about a third of it is exposed. Rotate the plug in the hole about half a rotation and remove the tool slowly.
Take out your co2 cartridges and the inflator adaptor, insert a cartridge into the inflator and get ready to inflate the tire. Place the adapter on to the valve stem and release the contents into the tire.
There are different kits out there, some will have the cartridge covered in a little plastic case and some not. If your kit doesn’t have the cartridge in a little case use you’re riding glove when you’re introducing air into the tire.
The cartridge will get really cold something in the neighborhood of negative 60 degrees Fahrenheit and that’s cold so wear some protection on your hand.
Most likely you’ll need multiple cartridges to get your tire back into the correct pressure zone so it’s best to be prepared with spare cartridges.
Once you have your tire inflated remove the adapter valve, removing the canister side first will release the air from inside the tire. Take out your tire pressure gauge and check your tire pressure now you can trim off the excess piece of sticky string.
One last thing and that’s the spit test. Spit on the repair and look for bubbles, bubbles mean that air is escaping from inside the tire and you did a lousy job so guess what? You get to do it all over.
It’s time to wrap things up and get back on the road. Repack your repair kit and gather up your trash, the co2 cartridges can be recycled. Leaving them on the side of the road is not the right thing to do.
As you ride home make sure you take it easy, extreme levels of acceleration braking and lean angles can cause the plug to come out and you are then at square one. While you’re riding home the heat building up in the tire will actually help cure the glue.
The most important thing to do when you get home is give your tire repair kit a once-over. Replace the items that you use so you have them at the ready next time.
Is It Safe To Plug A Tire?
Some people say yes go ahead and ride it and others will say replace the tire as soon as possible, we tend to agree with a ladder crowd.
Remember that all of the inputs of riding a motorcycle are transmitted to the ground through your tires, acceleration, braking, cornering and all that reaches the ground via contact patches no larger than the size of a credit card. It just makes sense to replace it as soon as possible.
You can get a new tire for around $99 so there is no excuse to be riding around on a bike with a puncture even though you have repaired it.
We hope you found this article helpful and have learned about how to work on your motorcycle and savin money by doing the work yourself. You might also learn a couple of tips by reading some of our other articles (especially the one about what we consider are the (best motorcycle tires available) or maybe our article when to change motorcycle tires which will make your motorcycling time just that much more fun. Thanks again for joining us we’ll see you soon now let’s go ride.

